Driver board and parts
OK, it's been over a week since my last post again. My posts will probably be only 2-3 per week (or less, depending on how things go). It's summer and my desire to sit inside has waned slightly.
Driver Board Design
Last Friday/Saturday, I set out to design a board with 1 driver chip per board. This was fairly trivial, because it was just a single 24-pin chip, 2 resistors, 1 capacitor, and a bunch of headers (for input signals, LED power, and LED wires). The limiting factor on how small I was able to make it was the headers along the outside edge of the board. The final board for that design was 1.1" x 1.3".
Sunday/Monday, I decided to put 2 driver chips on a board. When I had computed the cost for ExpressPCB's "Production" service, they had a minimum area per board (for cost reasons) at 4 square inches, so if I ordered 48 driver boards, the per-area cost was very high. Also, I had a ton of dead space on the back side of the board (I basically didn't use it at all) and I could easily put the 2nd chip on the bottom of it without too much issue. The final size of that board was 1.2" x 1.3". I had expected it to grow a bit more than that, especially since I had switched to headers that were 2 rows instead of just 1.
Since the 2-board area was still well under 4 square inches, I decided to try to see how a 4-chip board would be. Man, oh, man was that rough to route. I placed the chips and optimized the routing so that the LED signal pins were the shortest and easiest to deal with, mainly because there are 60 on the board. What that left me was 4 chips (2 on each side of the board) basically in opposite corners all pointing at each other. While not extremely hard in itself, there are 3 common signal pins, power, ground, and a unique signal pin per chip that needed to be routed. And they all need to cross each other in the center of the board. Oh yeah, and I had to design the LED voltage source to be able to handle at least 1.2 amps (20mA per LED * 60 LEDs) so the traces needed to be pretty wide.
Here is the end result of 2-4 days of layout and tinkering:
| Top + Silkscreen | Bottom | Top + Bottom |
| | |
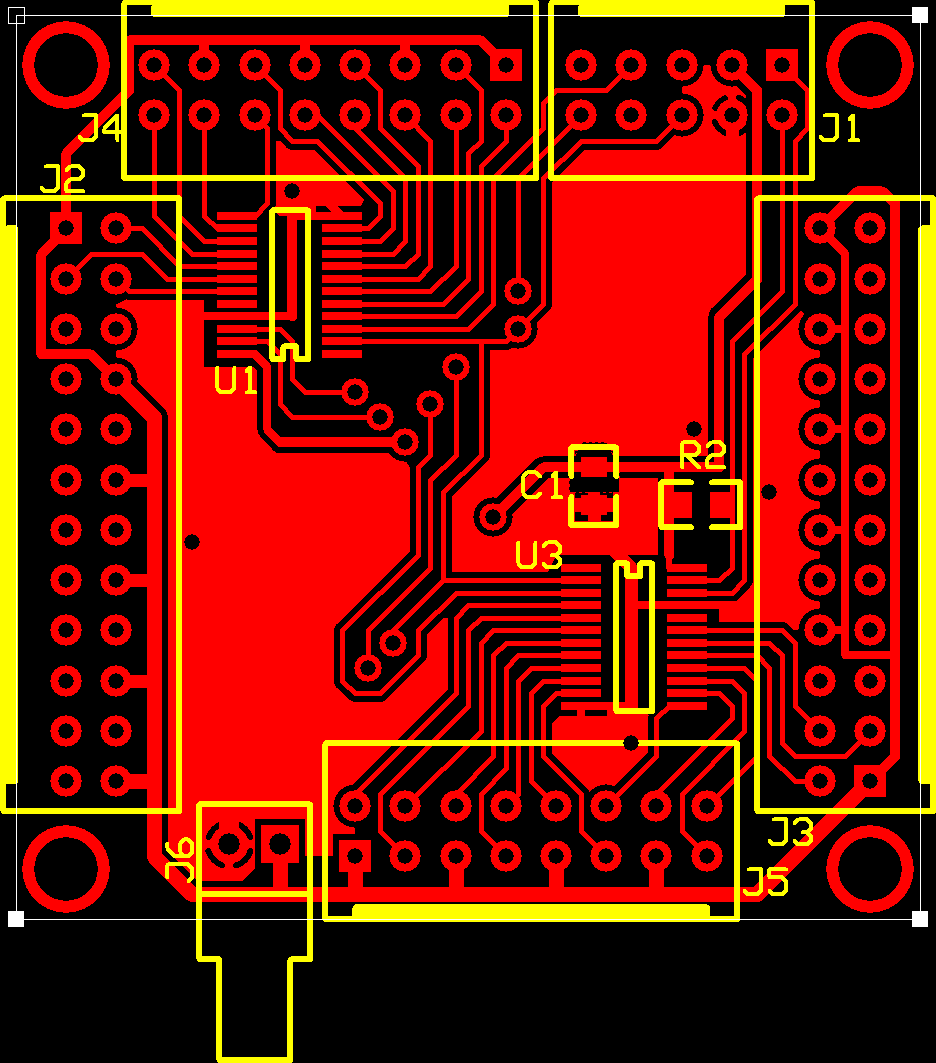
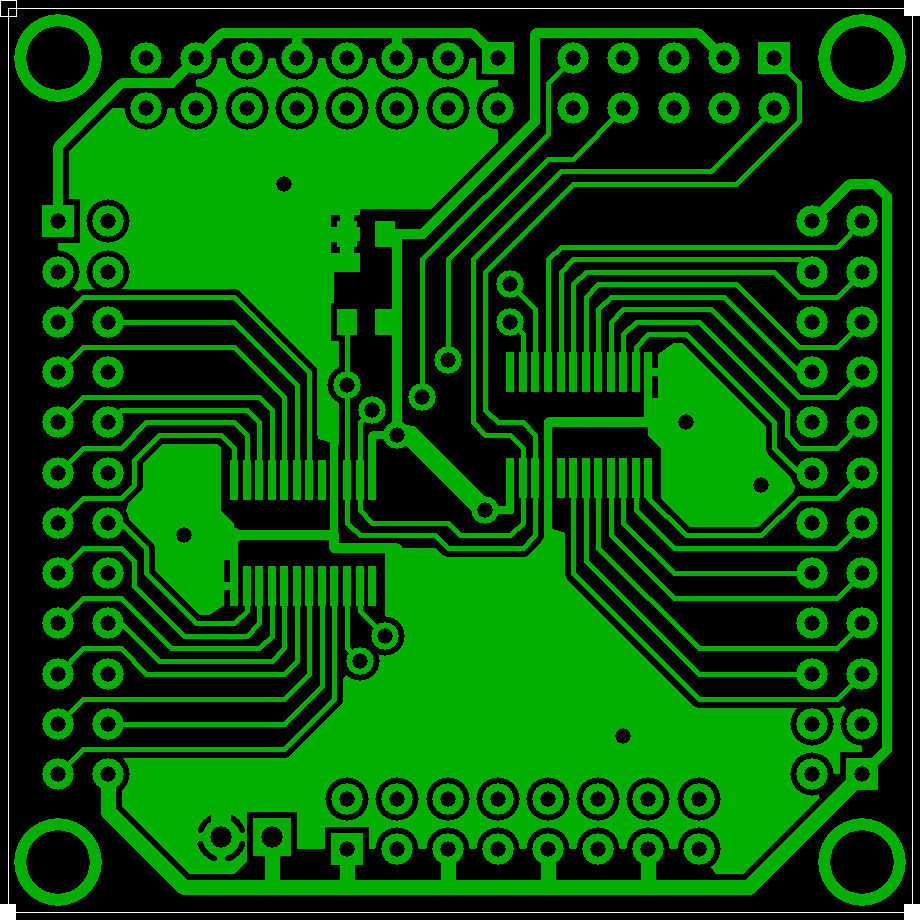

This board is 1.8" x 1.8" (which is over double the area of the 2-driver board, but this one was designed better with ground plane in mind. All of the shaded areas on those images are part of the ground plane. The thick traces running along the bottom edge of the board are able to hold at least 1A (and there's complementary traces on the top and bottom sides of the board to help distribute the power).
I ordered up 2 boards with just the "Standard" service (It doesn't have the silkscreen layer--the yellow outline in the first picture, nor does it have a solder mask--any non-via and non-contact areas are coated so the metal can't be soldered) to see how things work with it.
I also ordered a bunch of headers for the boards and a 12-bit, 8-channel ADC from DigiKey. The ADC has almost the same pin pitch as the driver chips (the ADC has a pitch of 0.65mm, which is 25.6mils) and has 16 pins, so that should be "fun" to test. With 14 distance sensors per half of the wall, that means I need 2 of those chips per half. I still really don't know how I'm going to test them, since their package is so small and I don't want to order up another batch of DIP adapter sockets. I will probably just design the board for them and see how it goes. The only major issue is that each chip is $8.10. Granted, I only need 4 of them, but if anything goes wrong, then that's potentially $16 I've wasted on lazyness.
Wall Construction Design
Since I had no suggestions about other materials to use for the pixel walls, I had to start hitting up people about any ideas they might have. One of my coworkers had a great idea of using tin to separate the pixel walls. It's light, opaque, relatively-easy to work with, and cheap. Since I need to be able to mount the distance sensors in every-other row, I need those rows to still be wood, but the off rows can be tin dividers. Also, each row's pixel divisions can be all tin as well. The outside walls will still need to be wood, as will the floor of the pixels (which will be about an inch down from the top).
To counter the fact that some rows will have a wide piece of wood and others will have a very thin piece of tin, I think the best approach is just to paint the underside of the acrylic black to make a uniform pixel boundary. I should be able to get straight-enough lines by using masking tape and then using some sort of black paint (I'm not sure which will stick to acrylic best yet... I'll take any suggestions/comments on it).
I also came up with a great idea for a different diffuser. I had some contact paper just lying around and decided one day as I was walking out the door to go to work to see how well it would work. I grabbed a roll, peeled off enough backing to stick it over a pixel, and turned the pixel on. It was amazing! Completely solid color with no "pulpy-ness" to the diffusivity. I actually kill 2 birds with 1 stone with this too. Not only does it diffuse amazingly well, it's also its own adhesive to the acrylic. I just have to stick it on and that's it. That's not to say that getting contact paper to stick to a large area without any creases or air bubbles is easy, but it would certainly be easier (and look better) than using a bunch of sheets of paper.
Once I get these test driver boards in and wire up more than 5 pixels, I will get some more cool-looking videos for everyone. (They better be cool-looking).
posted by Jurek @ 11:27 AM
![]()
![]()
2 Comments:
I was just thinking about the contact paper thing. It seems to me that contact paper would be pretty fragile. Maybe your design doesn't need to be all that robust against damage though, and if it got jacked up you could always just replace the paper on that cell right? For some reason I always pictured some impervious thing, but I suppose there really is no reason to go that route, and weight and other issues make sense to go with the paper...
Well, I had initially planned on putting the contact paper on the inside of the acrylic, so only the acrylic would be exposed. That, however, is not set in stone. I've yet to test it out.
Post a Comment
Links to this post:
Create a Link
<< Home