Jurek and the Amazing Techno, Colored DreamWall

Jurek and the Amazing Techno, Colored DreamWall

The title is mostly a placeholder, as I haven't really figured out a name for it yet. This project is a wall hanging that consists of semi-large triangular pixels using discrete RGB LED's and PWM to control intensity levels of each LED, resulting in a 4096-color display.

Thursday, October 26, 2006

Status update

This will be a pretty short post. I am leaving on a vacation for a week and won't update the blog (or the wall!) until at least next Wednesday (Nov 1st).

Assembly

I've got all 120 pixels glued in and working!!! whoo hoo! Let's add a few more exclamation points just to show how happy I am!!! OK, two more!!

All my progress was not forward, however. It saddens me to say that one of my driver boards is now not operational. During my testing, I noticed that the red LED on one of the pixels wouldn't work (out of 360 LEDs, only 1 didn't work... not bad). I tested a bit and eventually figured out that the pin for this LED from the driver chip wasn't making good, solid contact from the driver board. I could press down on the chip a little and then the LED would work again.
I tried resoldering the connection, but that only proved to make things worse. After resoldering, all of the surrounding LEDs glowed faintly, indicating a leakage voltage somewhere.

Luckily, I had made 7 driver boards, so I grabbed the remaining one and it works fine.

Everyone is just going to have to take my word for it that stuff is working great. I'll get some pictures and videos up when I get back. I promise!

Oh, and for those that are wondering just how crazy I am, I've put in 56 hours in the last 2 weeks (and that's with no work on Wednesdays and only half of Sundays).

Labels:

Sunday, October 22, 2006

Mondo Update

LED Segments

I've gotten 20 more of these done! That puts me at 152/240, with 2 more needed for this first module. I will probably do them a little tonight and then finish them up Monday or Tuesday. After that, I can stop for a while (thankfully). My fingers are pretty sore and sensitive from the heat and metal.

Assembly

I had to remove one of the pieces of contact paper from one of the pieces of acrylic, because the velcro I had been using just wasn't cutting it (or, more precisely, was burning it from the hot glue). I bought about 30ft of self-adhesive velcro, 3/4" thick, and used a fabric cutting wheel to make nice, straight cuts along it (gotta cut it into thirds!). This works wonderfully, as the adhesive on the velcro is unlike anything I've ever seen. It stick amazingly well to basically everything.
Anyway, I got a new piece of contact paper put on the acrylic and spent a couple hours today putting the velcro on it. The first (bottom) piece of acrylic is now completely done and looks "OK". I say "OK" because there are still air bubbles randomly throughout it and a few minor holes. Not the best job in the world, but I'm now under a small time constraint (read below).

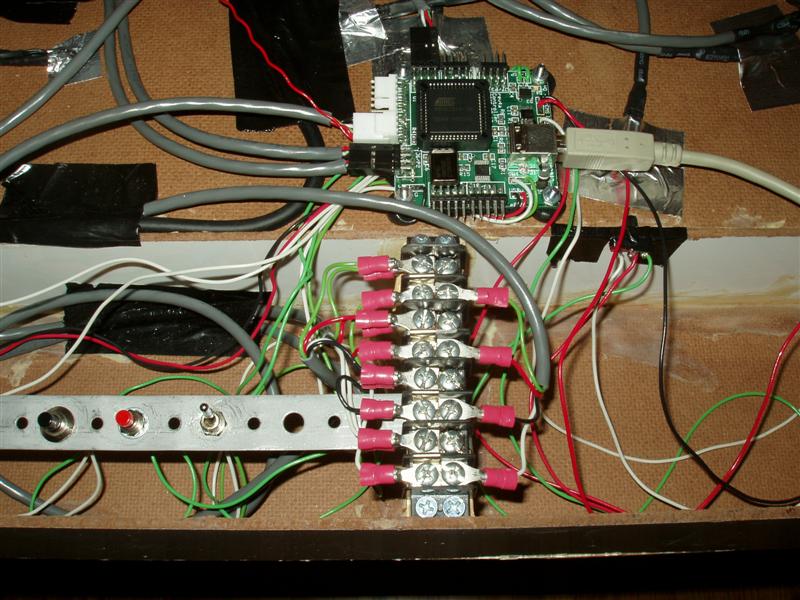
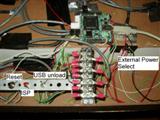
I finally got the processor board mounted to the wall, along with the different switches for reset, ISP, USB unload, and power supply selector. The only switch I have yet to mount is the main on/off switch. The switch I've been using isn't the one that I plan on using, so I haven't made a hole for it yet. Actually, I'm not sure if I will even use a switch right away. It's not entirely needed (the main power switch works fine) and especially not right away.

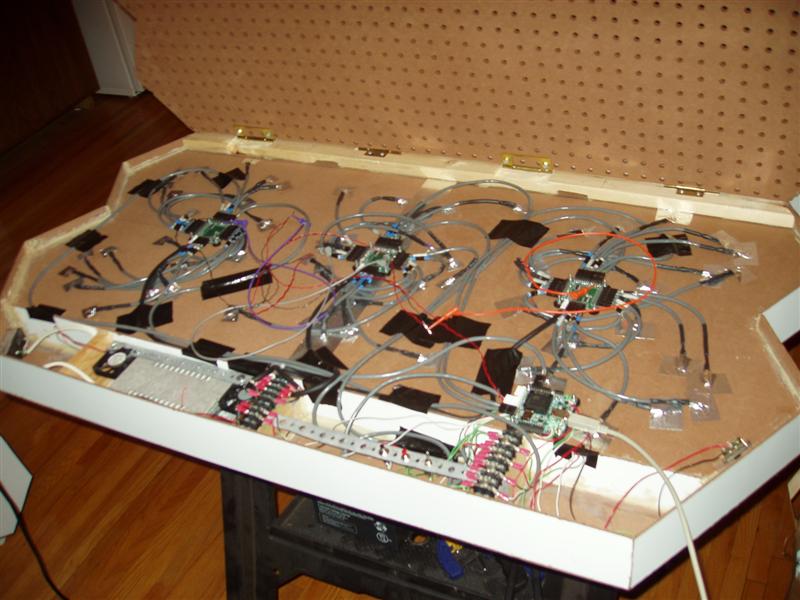
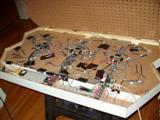
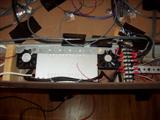
Here're some pictures of the guts behind the pixels (and man is it messy!):
InternalsPower SupplyProcessor MountProcessor Mount, with labelled switches


There're still plenty of wires to add, such as power & control cables for the "upper" 3 boards, as well as finalizing the cabling for everything. You can see in the overhead shot that there are orange, purple, and grey clip cables attached to random squiggly wires. These are the reset lines for the boards, and I'm going to be tying them to power directly, but I don't want to route the cables completely yet. Once I get all 6 driver boards working, then I will finish that step.


The processor and switches are mounted on the opposite side as the power supply, with enough room to take up the two remaining compartments (the angled compartment on the end is barely used).

You can also see the two fans (poorly) mounted for cooling. The one on the right blows into the area, whilst the one on the left blows out of it. They probably don't work too well, considering that there are large open areas for the air to simply escape through, instead of cycling the hot air around the power supply. I'm still not entirely sure how much cooling will be needed. I started doing some temperature measurements without the fans running, but the battery for my multimeter died, so I couldn't test any more. After about 3-4 hours of running 1/2 of the pixels in just 1 module at about 20% capacity, it rose from 74F to about 95F. Once I get everything running, I'll try turning all 120 pixels of module 1 on full white and just leave it there for a couple hours. If all goes well, it shouldn't get much above, say, 130F, which is still fine as far as I'm concerned.


I cut a small notch in the internal wall for the power supply source switch, which fit nice and snug in there. It's currently only being held in by duct tape (I don't think "duct tape" is even used by HVAC technicians on ductwork), but that can be "enahanced" with glue later. The other 3 main switches are all mounted on a simple strip of galvanized hanger strap. The large holes worked perfectly for the threading, and it's stable enough for what I need.
The large terminal block looks very similar to the one next to the power supply (which is used for power!), but is for the TWI bus. This seemed like the most effective method of breaking out the bus from the processor to the 6 boards that all require the same signal.
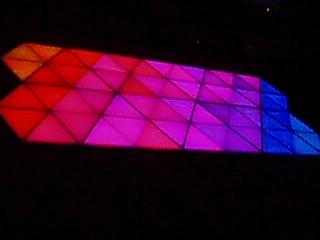
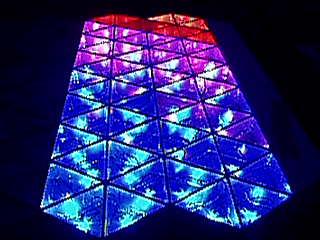
Coding

I've begun coding up a few basic tranform functions to apply to the wall. Currently I have:
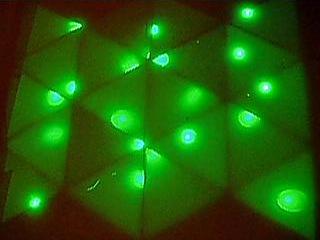
  • Inversion (inverts the colors of all the pixels... red -> cyan, black -> white, yellow -> blue, etc)
  • Shift up/down/left/right (shifts all pixels up/down/left/right 1 row)
The inversion can be enhanced to only invert certain channels (e.g. only the red channel)
The shifting functions can either roll over the shifted-out pixels, or just shift in a blank (black) pixel.
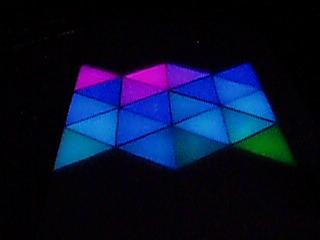
If you combine "shift up" with "shift left", for example (or "shift down" with "shift right"), then you get a tranform that shifts all pixels along the upper-left/lower-right axis (there are 3 axes with triangles, not the normal 2 with rectangular ones!). Likewise, combining "shift up" with "shift right" (or "shift down" with "shift left") translates the pixels along the upper-right/lower-left axis.
Simple, but powerful stuff.

Other potential transform functions are
  • Average (averages the surrounding 3 or 12 surrounding triangles)
  • Rotate (rotates the pixels 60 or 120 degrees about a given pixel)
  • Fade (slowly fades the pixel from its current value to black (or white, or any given channel!))

I managed to find, in the documentation, the status bits for controlling the speed of the TWI bus. I think, by default, the transmission speed is set to 62.5 kHz. By setting the speed bits to the fastest setting (266.6 kHz, a 4.3x speed increase), I was able to increase the framerate of the wall by about 50%. This was a very welcome change, indeed. Hoo-ray!


Announcement

Some of you may have been wondering why there has been a huge bump in the progress in this project over the last 2 months. Indeed, I've put in 27 hours this previous week, and 85 hours since September 1st. Well, there is reason for this, and quite an exciting one (for me, at least).

Now that it's official, and I've committed myself time-wise for it, I feel I can mention that the "technowall" (NOT the official name!) will be part of the upcoming (Artist's reception/opening is on November 17th) video game art show at Altered Esthetics: "Level_13: Bonus Round!". Their address at the time of the show is:

Altered Esthetics
1224 Quincy St. NE
Minneapolis, MN 55413

This is just off Broadway and Central; for those that need directions, please consult your favorite mapping website. If you need more information than this, please contact me.

I will only have the 1st module done, and won't have any computer interface ready, but I will be spending a fair amount of time with coding to get various random (and not-so-random!) patterns working. The pseudorandom seed switch (see the October 10th post) should keep everything random enough for my needs.

I have already designed several patterns, as well as a few other neat designs, with more to come (hopefully). If anyone wants to try their hand at designing something, here is a PNG template that I've been using:


Please email any creations to me! I'd love to see people's creativity with such a small (and oddly-constrained) resolution!

Exciting news!

Labels: , , ,

Wednesday, October 18, 2006

15x4 pixels done

Assembly

Well, now that I got my latest Digikey shipment in, I was able to wire up the TWI bus properly so I could connect more than one driver board to the microcontroller. I tested this out yesterday (10/16) and had a minor scare.
In my haste to get everything connected up to test, I accidentally wired up one of the power cables backwards. I first plugged everything in and hit the power switches, but nothing turned on. After flipping everything off and on a few times, I tried to see if somehow I connected things incorrectly. Everything seemed to be conducting properly, but then I noticed that the red and black wires were swapped going into one of the boards!

Oh noes!

I quickly disconnected everything, and the power cables were a bit warm. The ground pin for the TWI bus coming into both the driver boards had started to melt the plastic socket, and the header pin on the board itself had started to tarnish and turn black. I swapped the wires, plugged everything back in, crossed my fingers, and turned everything back on. Much to my relief, everything started working fine. The wiring was crazy messy, but at least the code was working fine for 2 driver boards.

So tonight, I set out to clean up most of the wiring. I started with the power supply and got that all organized and routed well, and even managed to install both the fans I bought for cooling. It took several hours to do that and reroute/organize the power and data cables going to the driver boards. Everything looks much better now and can handle all of the cable routing needed for the upper half, plus the power cables needed for the second module.

Video of 15x4 pixels running (3.9MB QuickTime)


Video, sans diffuser (3.0MB QuickTime)


Coding
So far, everything's holding up to the scaling from 4 to 12 driver chips, as it should. The only problem now seems to be speed. In the video, everything is running at about 15fps. This isn't horrible, except that this is with only 1/2 of the final number of pixels, so the final speed will be about 7fps. In my opinion, that is unacceptable for what I want.
I have managed to tweak the SDCC compiler to make things a bit faster, but I don't know if there are many tweaks left that I can do to speed it up any more. I will have to dig into the code and see what I can do for shortcuts. Right now, there are quite a few extra steps it's doing each and every time for computing the color value, so that's probably going to be my main focus for optimization.

More to come!

Labels:

Thursday, October 12, 2006

Gluing progress

Assembly
20 more pixels glued into place. That leaves me 33% done with the gluing. This round went much faster than the first time. Woo!

Coding
I've just been playing around a little bit with things here and there. Currently, there's not a whole lot I've been really attempting. I would like to have some sort of unique pseudo-random number generator. Pseudo-random is fine for what I need, but that's only as random as its initial seed, which is deterministic for the microprocessor without any sort of analog input (white noise, ADC, user input, etc). I think the easiest approach currently would be to have a small switch on one of the unused ports that can be pressed at any time while it's running that would update the seed. I could just have an unsigned int as a counter for the main loop, and whenever it detects the switch as closed, I can just call srand with the counter as an argument.

Parts
I'm going to be ordering a few odds and ends (wire, terminal blocks, crimp terminals) for the current stages I'm in.
I've recalculated a few times how many of each length of LED triplets I will need, and with my current calculations, I need to solder 31 more triplets of various lengths (2 10", 17 8", & 12 4") for the first module.

Labels: , ,

Tuesday, October 10, 2006

Coding
Wow, I've had a productive (and depressing and exhausting) last 3 days. This post is long, so please bear with me. It is entirely about coding, so I don't blame you if your eyes gloss over and you stop reading it because of boredom.

ADC
I set out on Sunday to try to get the ADC and distance sensor working correctly. The distance sensor was fairly easy to hook up and seemed to work fine. 0.4v to 2.1v, depending on how close something was (higher = closer). I wasn't really worried about that, however.
The ADC was of prime concern, and it seems that my concern wasn't without merrit. I was eventually able to get the code to write to the ADC, as well as read at least 1 byte from the ADC (all my TWI programming thus far has been purely writing). I only think I am able to read a single byte, as I'll explain in a bit.
Try as I might, I wasn't able to get anything usable from the ADC off the TWI bus. I could only seem to get the first 4 bits. It's a 12-bit ADC and thus requires 2 read cycles on the TWI to get all 12 bits. The first 4 bits are the MSB and generally the most important. The final 8 bits in the 2nd read cycle are the LSB's and still important. It seems like the only thing I have been able to get from it was all 1's (not promising, it means the ADC is flatlined somehow).

After a couple hours of poring over whitepapers and fiddling with code and a multimeter, I eventually found some bad news. The power being supplied to the ADC's is about 4.1v. The nominal voltage listed in the datasheet is 2.7v-3.6v (I assumed my voltage regulator would correctly drop the 5v coming into the board down to 3.3v). However, I failed to read the part that said that if the voltage is above 2.7v (NOTE: "above 2.7v" doesn't mean "above the nominal voltage range"), then the REF pin needs to be tied to VDD instead of ground, as it shows in the handy little wiring diagram (which is the way I have it wired up on the board).
So it looks like the ADC's on the board are bunk. I think they are functioning fine, but they don't have the correct voltage reference to properly do the ADC conversion.
It looks like I'll have to wait for version 1.1 of the microcontroller board to do any sensors. :( Boo-hoo! (unless I can rig up some other board with different parts).

Compiler
My next major hurdle was something that has been lingering with the code since day 1. I have been using Keil's uVision development suite for the 8051 microprocessor. The starter kits came with an evaluation version of this software, which is fully functional except that you can't compile code larger than 2k bytes. I had been hovering at just under 2000 bytes up until I started testing the ADC, but then noticed that I had to start removing unused variables because I was hitting the limit. I looked into pricing for the software, but was immediately floored at the $1700 pricetag. I found a newer version of the software (as an evaluation version as well) and inquired about whether or not they had a "light" or "hobbyist" version. Of course, no go there. $1700. Take it or leave it. Well, I certainly chose the latter option.

After some quick searching, I found many different options for 8051 compilers, both freeware, cheap, and full-priced (with evaluation versions). I tried them all. Some several times. Some of them had really horrible C compiler support ("bit" wasn't a typedef, incomplete SFR's (Special Function Register), etc). Some I just couldn't get to work (horrible UI, DOS-based IDE???, goofy compiling steps).
My most-promising candidate was SDCC. It's an open-source retargetable compiler for various microprocessors. It supports Intel 8051, Zilog Z80 (TI-85 I think and GameBoy), Motorola 68HC08 (precursor to the 68HC12 line), and Microchip PIC16 & PIC18 lines. It was able to compile the uVision code basically out of the box (I had to change a few include files, which is understandable).
Unfortunately, the first time I tried programming the hex file onto the uC, it failed. After a brief visit to the documentation, I found that the default format, .ihx, isn't compatible with most programmers and must be converted to .hex with an included converter. This I tried and again, it failed! Back and forth I went, comparing uVision .hex to SDCC .hex and trying various compiler options to no avail.
I did some searching on their message boards this morning and eventually found a post referring someone to search on 8052.com for help. Then I found this post:
Atmel has been shipping boguous header files for several "non Keil" C compilers for some years now. You're lucky if IAR throws out warnings/errors.
(The header files Atmel ships for SDCC are boguous too but the SFR definitions look like variable definitions to SDCC so you get no warning.)
Vunderbar!
So I downloaded the header file they provided (Thank the Gods!) and after some quick modifying of the SFR header, I was able to get it to compile and run in both uVision and SDCC!
Yay, the shackles of a 2k codespace have been broken!
However, with one very minor caveat, the SDCC compiled code is about 50% the speed of the uVision code. Not a big deal currently, and I don't think it will impact me too much. I have yet to dig into compiler optimizations, so there may be some speedup yet to be had.

And that is how I spent my summer vacation...

Labels:

Saturday, October 07, 2006

Pretty Colors!

Assembly
I made some more good progress today. I got 20 of the pixels glued into place (the first driver board I was testing with Thursday). This means a far better color mixing than Thursday's video had. As you can see by the first video (4.2MB), there are really very few hotspots at all and you have to look hard to find them.


The second video (3.4MB) was a request by someone who wanted to see the LEDs in action without the diffusing acrylic. It still looks pretty neat and gives a bit different of an effect. Maybe I can make 2 different tops, one that's the standard acrylic with contact paper and another that's either clear acrylic or slightly-buffed/sanded.


Coding
Yes, I actually have made a small amount of progress in the coding department today. There were a couple bugs and inconsistencies with the way I was coding everything up. I wasn't able to address a single driver chip individually, so I was seeing some rather odd side effects whenever I tried.
The main issue I tracked it down to was P0 (one of the I/O busses) not working at all on either the starter kit board, nor my own board. Perhaps there's a processor register setting that I'm not doing to get these ports to work properly; I'll have to dig through the manual.
As is evident in the videos, I am quite able to address each driver chip individually.

Miscellaneous
I also tested to see how white "white" is, and it's rather sad and abysmal. On most pixels, it's quite pink (red is overpowering), and in others, it's purple or blue (green is underpower). It's a little late in the game to fix this, so I guess I'll just have to live with it. Oh well... :/

Labels: , ,

Friday, October 06, 2006

Celebration

Assembly

There is a certain amount of celebration in order!


I cobbled this up last night. The color mixing is absolutely horrid, because this movie was taken upside down (the wall is sitting on sawhorses, backside up) and the LEDs are just hanging in the pixels. I haven't glued them down yet, because I wanted to make sure everything still worked.
I tested to make sure all the individual colors still worked, and I tested first with the starter kit board then my own board, and I'm quite happy to report that it still works.

I still have to figure out how to connect the TWI bus to all 6 boards (it's pretty trivial to connect to 1 board, but I don't have TWI outputs on the driver boards... oops). Perhaps I can use another 8-position terminal block. It seems a bit overkill, but whatever works in the end, I guess.

Labels: